Tuesday, December 24, 2024

Into Darkness-Scenario 4 Part 1-The Advance Into the Woods


 September 1941 was a disaster for the Soviet Southern front.   Kiev had fallen and General Kirponos was dead. 600,000 Soviet prisoners entered German captivity.  Kharkov was the next major target for Axis forces in the south, but there were small Soviet detachments to deal with as well. German and Hungarian units were detached to find and destroy the sometimes resisting and sometimes fleeing Soviet troops. 

The Soviets made use of the primordial forests that dotted the country. Routed soldiers would flee and rejoin units or establish partisan bands that would cause continuous headaches for the German and Hungarian troops.  Companies of men and supports were needed to flush out the defenders hiding amongst the trees.  This task is represented by the fourth scenario of the Barbarossa campaign.  

Notes: This battle could be very short or could play for several weeks.  Once again, several house rules, mostly untested would be implemented.  

The board is a forest with small clearings throughout.  A small river cuts down the middle of the board. .  Six tokens will be “placed” on the board.  Three represent Soviet Jump Off Points and three represent equipment, wounded and other material that the Soviets are trying to get off their table edge. Which is which is not known until later  


Because we are immature and easily entertained, the tokens were to be  literally tossed onto the board in alternating turns by Axis and Soviet players with the tokens having to land in the area of play.  This was scrapped after tokens hit the floor and there were possibly eye injuries from bad throws.  We are not athletes in the traditional sense.

It ended up like this 


The Material Tokens

Soviet Victory can only be achieved by the Soviets getting at least two of the three Material tokens off their side of the board or by breaking the Force Morale of the Axis side  Material tokens can only be moved 6” at a time by spending a Chain of Command die. Once the Material token is off the Soviet Retreat to Safety table edge it has escaped  

Axis Victory can only be achieved by the Axis capturing at least two Material Tokens.  This is done in the same way as capturing a Jump Off Point by having a friendly model within 4” and ending a turn.

Additionally, the Axis may attempt to block the movement of the Material token by spending a Chain of Command die and rolling a 5 or 6 on a D6.  Only one attempt can be made per Material token movement action. If successful, the Soviet side still spends rhe Chain of Command die to move the Material token but the token doesn’t move.

With the tokens now placed (not thrown) the Soviets randomly roll to determine which three tokens are the Jump Off Points  

The rolls set up as follows:


This set up created a situation in which the Soviet left flank was uncovered and the right flank was heavy with Jump Off Points.  This was not immediately clear to the Axis side, but would be as soon as the Soviets began deploying.

The Axis forces acted first, and not knowing where the Material Tokens were located advanced in a balanced line with the Hungarians taking the right, but also prematurely deploying a light Anti-Tank gun with a field of fire down the railroad line and across the rail bridge. The Germans deployed in the center facing an open bowl and to the left of a small river that meandered through the center of the board.

So peaceful

Hungarians advance 


The Soviets quickly deployed on the far right and across from the Germans facing the open bowl in the center.  This would be where the day’s first action would be focused.   A Soviet rifle squad that had been hiding amongst the trees opened up on the Lancers and drew first blood.  The Germans responded in kind and deployed a medium machine gun and 38T Czech tank.  Two more Soviet Infantry squads deployed in succession.  The fire was hot.   The initial German Squad was bloodied and pulled back to be replaced by a second Squad.  The Soviets were using their cover well and sustained only light casualties, but the tripod mounted MG 34 was and Czech tank was going to be a problem. 

The Battle of the Bowl..The Blood Bowl?

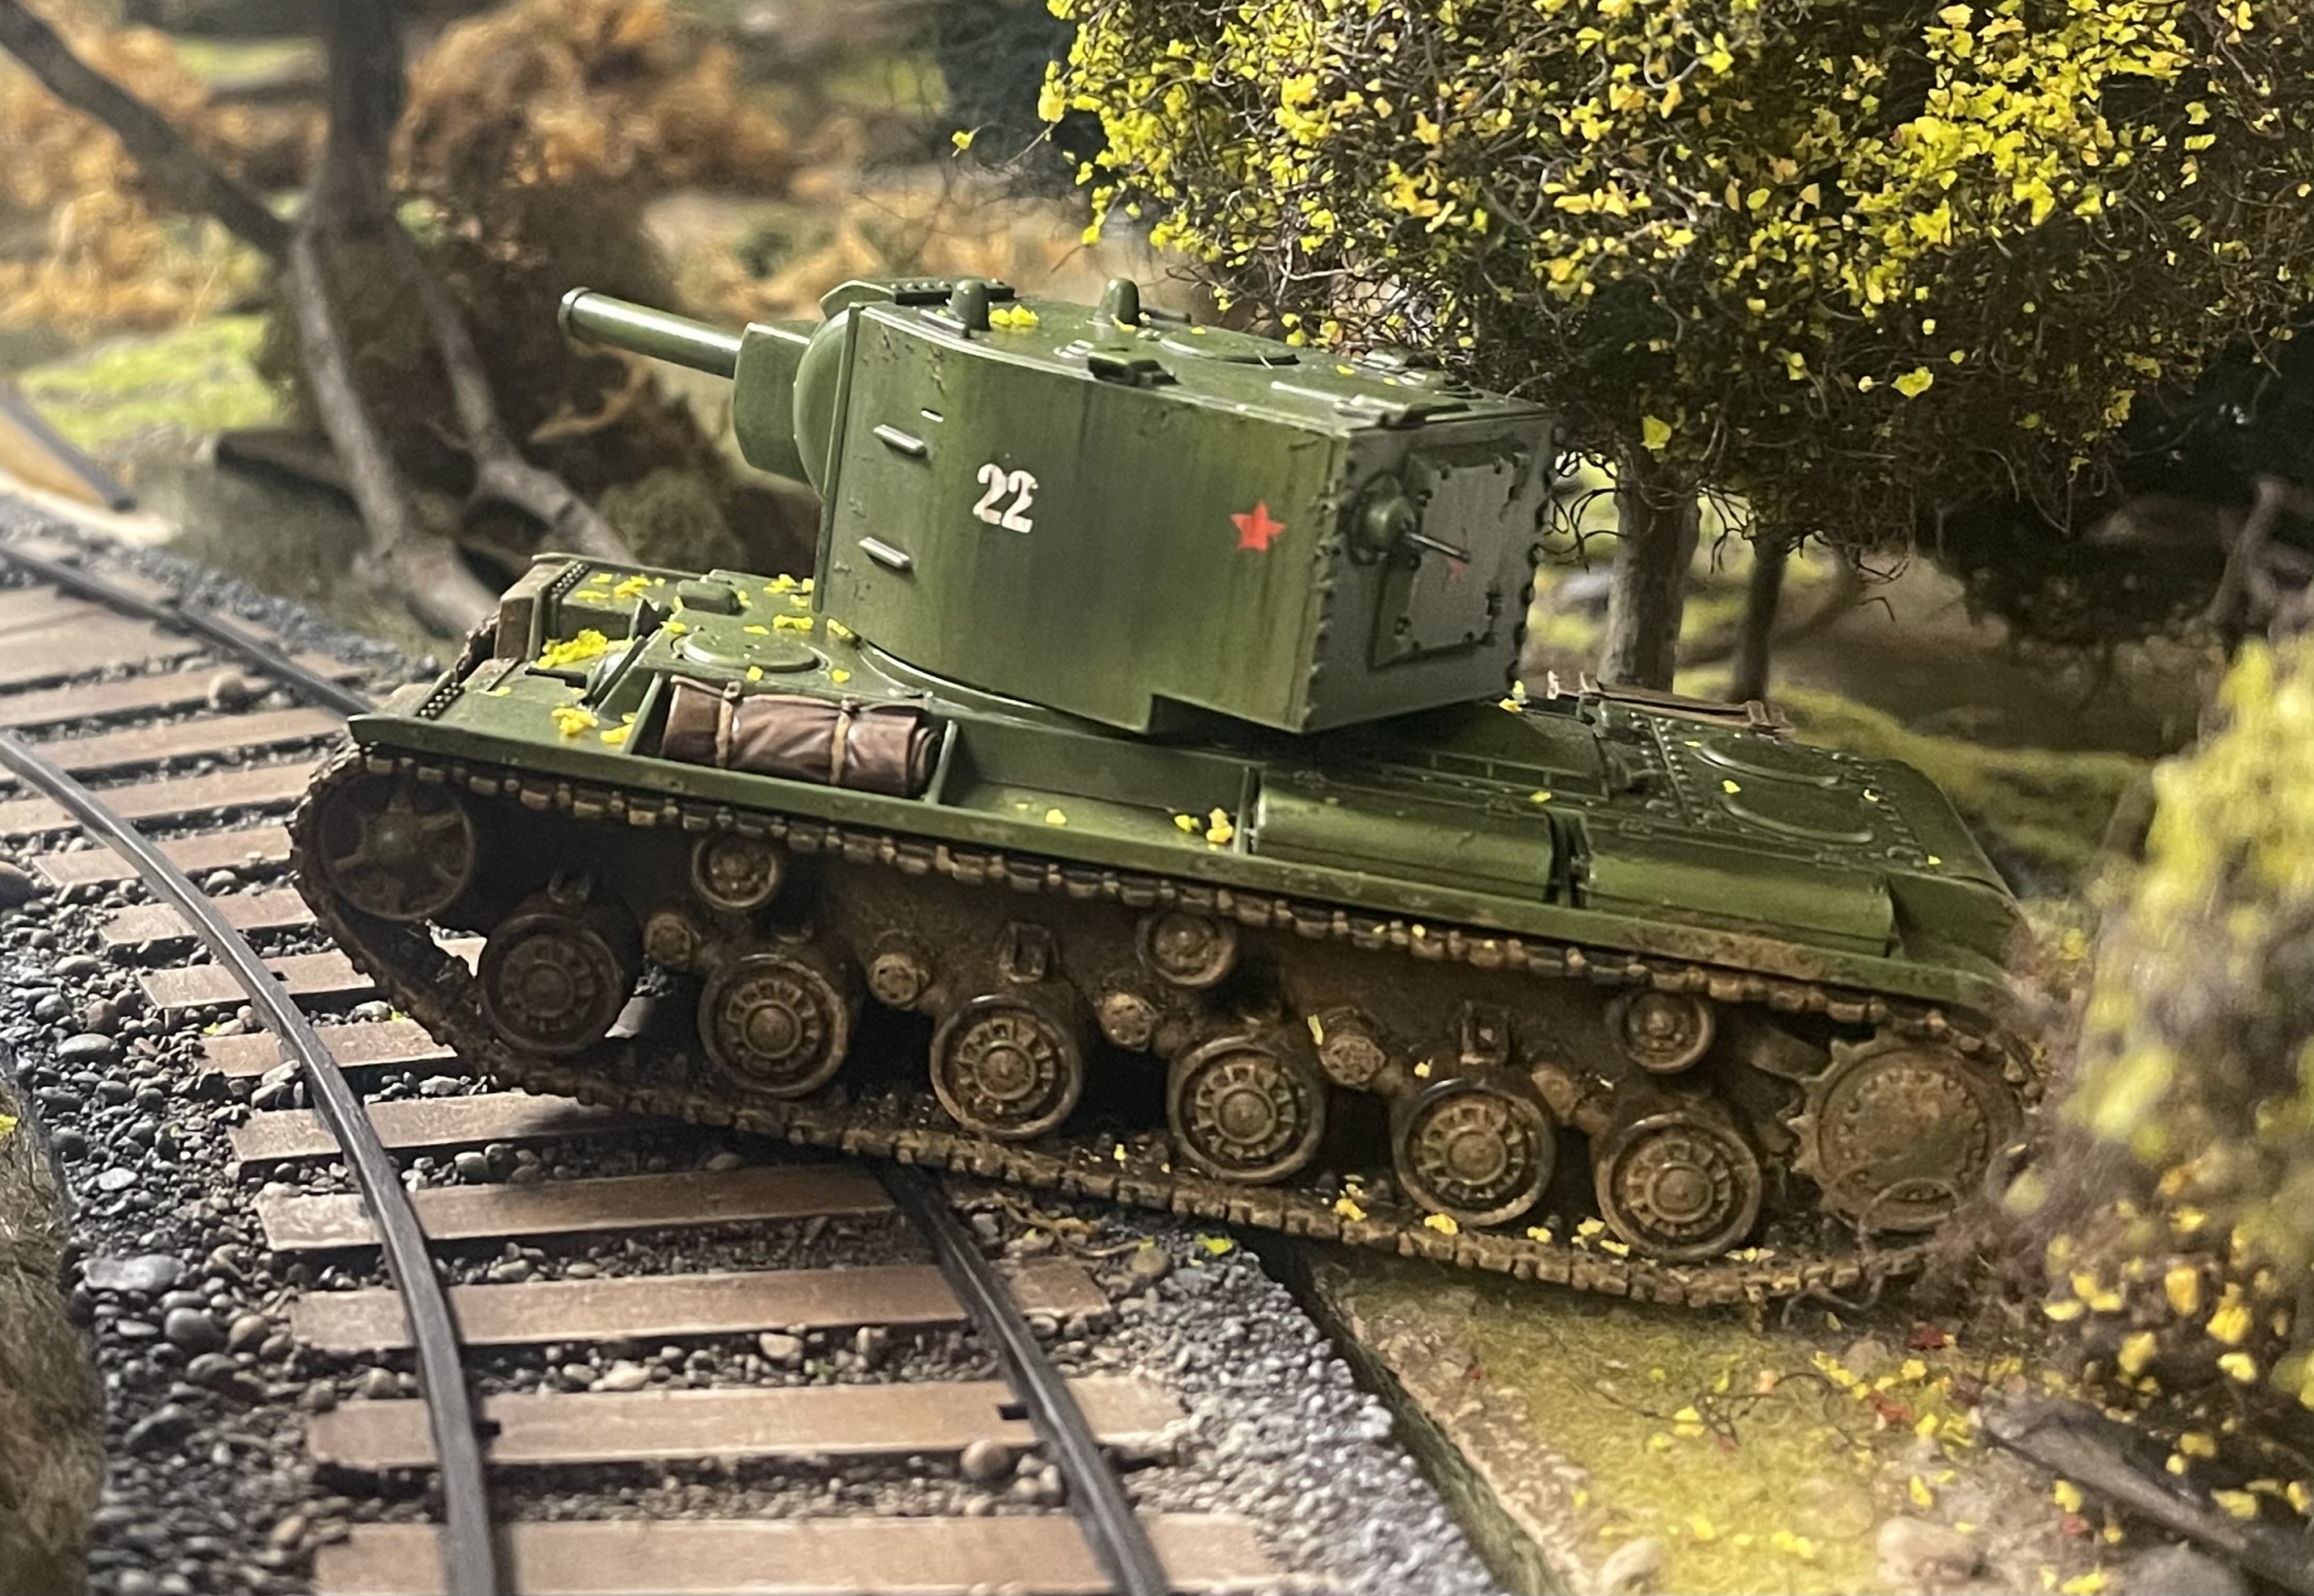
There was a solution to such a problem.   Just as the sun will always climb the morning sky, the dreaded KV2 will come rumbling through the woods.

Game Note: Again.. the KV2 was pulled in the random support draw by the Soviet player.   The Soviet pool of tanks includes something like 30 vehicles and AT guns of which two are KV2s.  Each Soviet player, of which there are two in this scenario, draws two assets.  That’s a 4 in 30 chance.  

 And so it was that the KV2 rolled across the railroad tracks and first pivoted its monstrous gun to blast the meek and ineffective Hungarian AT Gun.   Leaves dropped onto the beast as the forest shook.  Then the tank rolled forward and blasted the Germans facing the bowl.    Inspired, Soviet rifles and Machine guns joined in the fire, and drove off the Machine Gun crew.  Dead and running crew left an unmanned gun quiet and useless in the deep woods.


Elsewhere the Hungarians raced for the exposed Material token that represented valuable ammo, supplies and wounded on the far Soviet left.  Crossing heavy brush and downed trees, the Hungarians advanced.  The desperate Soviets moved left to counter and a brisk and deadly firefight began.


The Soviets were able to withdraw the supplies back by using a COC die.   Six inches closer to safety!


On the Axis far left, a pair of cautious German infantry squads with Machine gun support advanced slowly toward a single Soviet squad that acted as bait to draw the Germans away from the objectives.


A Stoic Soviet leader stands and watches his charges stoically 

The opening of the forest battle had commenced.   Could the Axis forces push forward and grab the valuable Soviet supplies, or would the Soviets hold them off and make it away to safety?  

To be continued  


Friday, December 13, 2024

Counterattack Near Uman-Scenario 3 Part 5-The Defense

 The Soviet counter attack was nearing its conclusion.  They had pushed in the Axis right flank and driven the Hungarians from the small farm, causing significant casualties.  In the center and Soviet right the Russians had found stiff resistance and were progressing slowly. 


The Single remaining German infantry squad on the right decided not to stick around and fled through thickets and onto the road that exited the smaller bridge.  The Axis wisely used a COC die to move the Jump Off Point toward the center, thus avoiding its capture.  A reserve Hungarian squad then emerged from hiding at the new JOP location and battled with the Soviets who were in pursuit from the farm.  They also deployed a Medium machine gun to cover the center of the line against the single Soviet squad that continued to lurk in between some buildings.


The Panzer 3 pivoted to engage the T-26.  A blast from its main gun banged off the Soviet tank killing the driver as shell shrapnel breached the vision slit.   The remaining Soviet crew had enough and bailed from the tank, and fled back across the bridge.  


On the opposite flank rhe Russians were taking heavy losses on the large bridge.  The hero of the moment was a medic who had crossed the bridge with the assaulting infantry.  He bandaged both the Junior and Senior leader and kept the squad from disintegrating.

The medic has a gun.  Why does the medic have a gun?

The Germans continued to pour fire into Soviet fighters  who clung to the near bank in the walled courtyard in the middle of the line.  The fire was too much and the Soviets routed.  The attack in that part of the line  was effectively over. 

A Hungarian sniper used the opportunity to climb to the third story of burnt out committee building and send a Soviet mortar squad across the river fleeing to cover. 


Back on the Russian left, the Soviets were obsessing over the Panzer.  A 45mm Anti Tank gun that had been quietly deployed in the woods next to the large bridge made its presence known by bouncing a shell harmlessly off the front armor of the Panzer.  


The Panzer CO decided he had enough and drove towards the middle of the line along the road perpendicular to the small bridge road.  Thinking fast, the 45mm gun crew wheeled their gun and pushed it through the wood, allowing them to catch the German tank in the flank.  They slammed a shell into the breach and fired.  A hit!  The Panzer driver was killed and the tank ground to a halt, while the Panzer crew pulled the dead driver from his seat and tried to replace him.  A Soviet with a satchel charge ran up to the tank and let fly with the explosive but was unsuccessful in doing any further damage. 

Several German squads decided it was time to clear out the sneaky Soviet squad (sounds like an Eastern European Scooby Doo gang) that had been lurking in the middle.  The Soviets pulled back to safer ground and fended off an ill coordinated German charge, causing a high level of carnage. 


As sure as the sun rises in the Russian east, whenever rhe KV2 (against odds) shows up, an 88mm gun shows up (also against odds) as well.  So it was that a short duel was had between these two forces of nature.  It didn’t live up to the hype.  The 88 missed and the KV caused no casualties to the gun crew in the brief scuffle. 


This turned out to be the last act.  

The Results

The original condition for victory was the elimination of the Force Morale of the opponent.  Five weeks of ( real) game time left the Germans with 11 and the Soviets with 13.  This does not tell the story.  The Soviet attack on the right and middle was over.  The Germans had complete control of the defensively strong stone and steel buildings at the city’s edge. The Soviets held the farm but would have to fight across a narrow slice of land and into the city. Any further Soviet support would have to either come from the lone Jump Off Point to make it across the bridge near the farm, or by crossing the big bridge ( a death trap); or another launch of rafts (a bigger death trap in the light of day.)

The Soviets just didn’t have the immediately available support to break into the city.  Their casualties would have been enormous and they would be attacking without sufficient command support, as a good deal of  squad and higher leaders who made it across the river were dead or wounded.  

In the end the Soviet attack was not successful.  The German army would continue their advance.  They would now be ordered into a very nasty few acres of  woods where they would have to flush out the regrouping Soviet army…

Friday, December 6, 2024

Counterattack Near Uman-Scenario 3 Part 4- Caving in

 The Soviet counterattack continued to press the Axis defenders after landing on the far bank as dawn broke (see here.) All across the front a foothold had been gained. Soviet squads climbed out of boats while more rushed onto the two bridges spanning the river. The German and Hungarian defenders had reacted slowly due to a Soviet God of War bombardment that kept heads down and delayed reinforcements.   The Axis forces initially blunted the attack with fierce defending, and high officer casualties especially among the Russians had impeded the attack.  The overwhelming numbers of Soviets were beginning to be a problem especially on the Hungarian flank where the heaviest attack struck. 

Crossing the large bridge. 

The Hungarians were having problems defending a not very defensible position.  They were outnumbered, their Toldi support tank had been sent up in flames, their Cbasa armored car was ineffectual, and only with help from a German Panzer 3 were they able to hold on.   That was not to continue.  

The T-26 shelled the armored car, first wounding its commander and then bailing the crew.  The T-26 had advanced a bit farther than it should and the Panzer 3 rolled over a fence and caught the side armor of the smaller tank.  The order to fire was given and the Panzer struck the turret of the little Russian tank, wounding the leader and disorienting the crew.  The Panzer fired again, temporarily disabling the T-26. 

This is ridiculously close stuff

In order to save their tanker comrades, a Soviet infantry squad rushed from the bridge behind the T-26 and straight at the Panzer 3 while readying satchel charges and Molotov cocktails.   A Hungarian squad reacted  to protect the tank and a hand to hand fight exploded around the tank.  The Soviets overwhelmed the depleted Hungarian squad and annihilated them, forcing the only surviving Hungarian Senior commander to flee.   Two more Soviet squads crossed the wheat field from the opposite side of the yard and poured fire into the other Hungarian squad. 

The trap is closing 

The brave Hungarians had bought the tank time which the Panzer used to step on the gas and lurch past the T-26 and away from the swarming Soviets.  

With the Panzer gone, the remaining Hungarians were doomed.  Two light marchine guns, a Maxim machine gun, and several riflemen pinned the Hungarians into place while another squad swung around the flank and poured murderous fire at the out in the open defenders.  The Huns were wiped out.  


 A single German squad that was attempting to extract itself from this mess pulled back and tried to join the tank in a retreat towards the built up area where it could try to regroup.

The Germans used their Hungarian shields well..

The Axis right flank was good and well caved in.  They had no effective defense on the right and the Soviet steamroller was moving by a brilliant tactical maneuver. 

On the Soviet right, things were more difficult.  Unlike on the Axis right, the Axis left was very defensible.  Two Soviet infantry squads and another Maxim machine gun team were caught in murderous crossfire that routed one squad and pinned the other.   The Maxim team was also pinned.  


Two more Soviet squads rushed the large bridge and sustained heavy fire from two German infantry squads.  Casualties were horrific.
 
The Russians managed to reach the far end of the bridge where a very brave engineer squad cleared the barbwire entanglement under heavy fire. 

It’s not so good to have a bunch of red tokens by your troops…those are shock. 

The effort by the brave wire cutters, alas, seemed to be in vain. Heavy fire from multiple Mg34s, riflemen and German machine pistols raked the attackers. 

Oh yeah, the ever present KV-2 showed up again. 


This beast was persistent.   Despite odds being against it showing up even once in three battles, it rolled onto the battlefield in all three.  It narrowly survived an 88 shell in the previous fight, and here it was again lobbing shells from across the bridge into the German infantry. 

A newly finished paint job deserves two pictures. 

The Soviet tanks were pretty but infantry wins battles.  On the German right it was sorely lacking. 

Game Note: At this critical point the Germans were taking a pounding in Force Morale which had dropped from 20 to 15.   The Soviets had dropped from a start of 35 to 26, which is where they stood at the start of the evening and then to 18 by the end of the evening.  Heading into the final push it would be close. 

The end of the third fight of the Barbarossa campaign was closing in.  The Soviets dominated the more open rural part of the riverbank but were struggling in the more built up area as expected.  It all came down to morale.   The Soviets had taken a bigger hit but the Axis had less to lose.  Could the Soviets exploit their numerical advantage or could the Germans make it too costly to push into the city?


Revenge

 The Mischievous Misbehaviors were feeling put out.  The attack on the Maple Mill Militia headquarters (now known by the Maple Mill Militia ...